


Beauty
DIY: Color Block Nails
By |
0 Comments
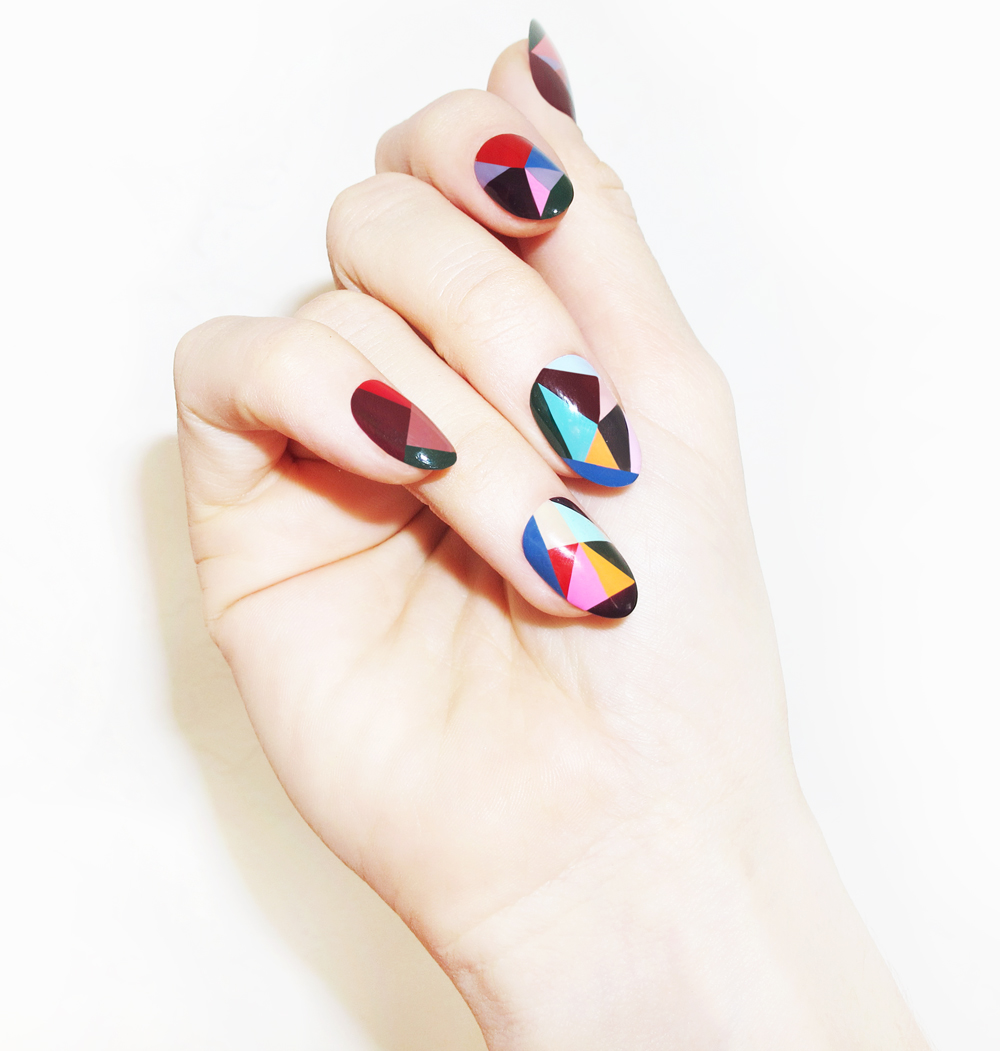
What you will need:
- Tape: Preferably stripping tape, but regular tape is also fine. If you do use regular tape, stick the tape to your hands a few times prior to sticking it to your nails, so it loses some of its adhesive and gets slightly less sticky. This will prevent smudging your base color, once you start creating the blocks.
- 4 Nail Polish Colors: 1 Light color. Such as white or a pastel. A lot of lighter shades appear more translucent and glossy on the nail then they do in the bottle, so be sure to choose one that you know will look opaque and bold with only one or two coats. This will be your base, so it is very important the color really pop and create an obvious contrast. 3 Bright and bold contrasting colors, you think looks nicely together. These three colors will make up the block component.
- Clear, top coat nail polish
- A fine nail brush
Directions:
- With you light, opaque shade, paint all of your nails with 2 coats, creating a solid base. Apply a layer of top coat. Allow your nails to dry completely before progressing to the next step.
- Cut little pieces of tape into thin strips. Using two strips per nail, apply the tape on top your nails, dividing the nail into thirds. You can create a variety of shapes with the tape on your hands, and whether you want every nail to be exactly the same or have a different design is completely up to you. Carefully play with the tape, and see which style you like the best.
- Take one of the bold paint colors, and carefully paint one section of each of your fingernails. Try to paint within the lines, as close to the nearest tape boundary as you can. Painting directly on top of the tape strip is preferred for this style, but only attempt to do so if you know you have a steady hand. However, DO NOT paint beyond the tape strip and into another section. Clean up the outer edges of the nail with the fine nail brush.
- Repeat step 3 with both your second and third bold color.
- When your nails are near dry, carefully remove the strips of tape. This will reveal the light shade beneath your nails, creating the appearance of lines.
- Paint with the clear top coat over all nails to prevent chiping
Voila! Enjoy your funky, cute, totally original nails all Summer long!
