

 refinery29
Beauty
Advanced DIY Nail Art Tutorial- 60’s Retro Polka Dots
Last week I showed you how to do simple nail designs, in our article, 5 DIY Manicure Designs for Beginners. This week, we are taking it up a notch with a mod, chic, retro-styled polka dots design that I recently discovered. Not going to lie, this style does require a little bit of patience and maybe a bit of practice, as well as a steady hand, but this funky, fierce look is totally worth the wait, once you have nailed it!
What you need:
- 3 bright, bold contrasting colored nail polish
- 1 metallic colored nail polish
- 2 bobby pins
- Clear topcoat
- Nail Polish Remover, cotton pads, and Q-tips (to clean errors)

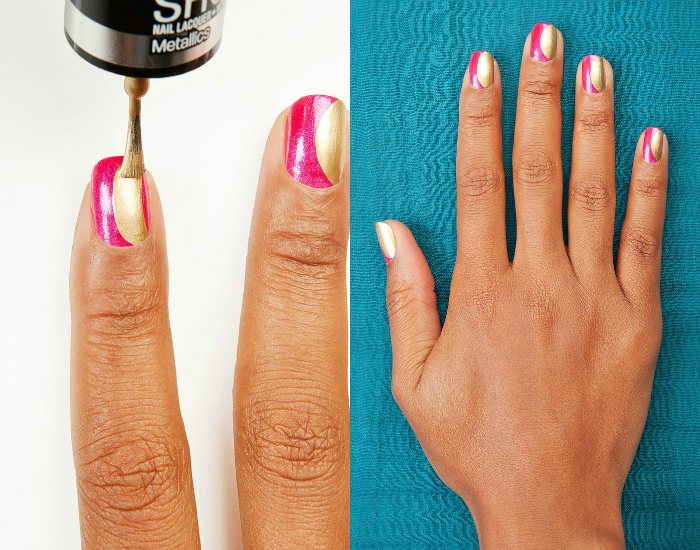
1. Paint a base coat (2 coats!). Though your color of choice is completely your own prerogative, we recommend a bold, bright color as seen here, for the best results. The polish shade being used in this demo for the base is Maybelline New York’s Color Show Lacquer, in Crushed Candy.

2. Wait for the basecoat to dry. The polish shade being used in this demo for the crescent is Maybelline New York’s Color Show Lacquer, in Bold Gold. Take your metallic shade to carefully paint a crescent, by holding the brush perpendicular to the nail, carefully outlining a semi-circle from the upper right corner to the lower left corner of each nail and working from the outside in. Fill in the semi circle, without going outside the metallic line.
*Note: If you anticipate this maneuver to be a tricky one, try practicing the motion on your nail without any paint on your brush, to help plot the curve and get your muscles accustomed to the delicate movements.
3. With your metallic shade, repeat the creation of a crescent, but on a smaller scale. Do this by holding the brush perpendicular to your nail, and carefully outline a semi-circle from the lower left corner to the middle left side of your nail, working from the outside in. Fill in the semi circle, without going outside the metallic line.
Your left crescents should be roughly a third of the size of you larger crescents, depending on the size of you nails.

4. Allow crescents to completely dry. Paint with a clear topcoat.


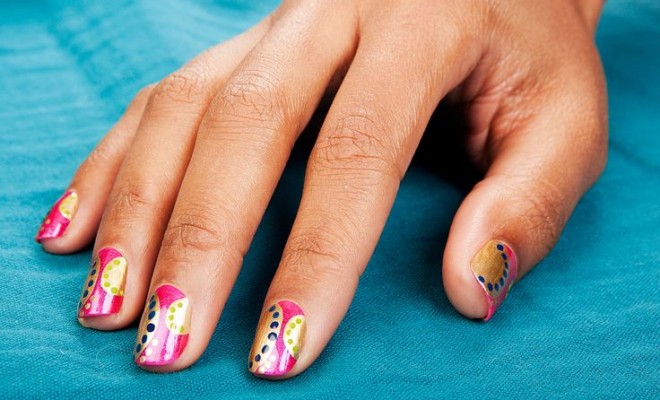
5. For the little bubbles, choose two other colors that contrast your bright base and metallic crescents. The polish shades used in this demo is Maybelline New York’s Color Show Lacquer Sapphire Siren and Go Go Green.

6. With the rounded end of a bobby pin, dip into one of your contrasting colors- the demo is using Sapphire Siren first. Inside the large metallic crescents, stamp the inner edge with your bobby pin, tracing the arc and making 6 to 8 polka dots. The exact number of polka dots is not that important and is really determined by your nail size, however it is important that you try to make each little dot similar in size. To refresh your memory on your polka dot technique, click here.

7. With the rounded end of a different bobby pin, dip into the other of your contrasting colors- the demo is using Go Go Green. Inside the small metallic crescents, stamp the inner edge with your bobby pin, tracing the arc and making 4 to 5 polka dots. The exact number of polka dots is not that important and is really determined by your nail size, however it is important that you try to make each little dot similar in size.

8. Clean the ends of one of your bobby pins. Dip the rounded end into your metallic shade. With this, add 2-3 more dots on the outside edge of your large crescent, tracing the arc on the original basecoat, which in this demo is Crushed Candy, by Maybelline New York’s Color Show Lacquer.
9. Allow all dots to dry completely. Paint with a clear topcoat.
You’re all done! Groovy, right? For more information on how to get this style, click here.
*Photographs by Mark Iantosca
Source


